
Wednesday, June 30, 2010
Monday, June 28, 2010
One Yard Wonders: Folklore Bag

I mentioned a few posts back that I used one of my junk store fabrics to make a craft that I didn't get any pictures of. Oops! Well lucky you! I made the folklore bag from One Yard Wonders for my mom for her birthday, and got my her to send me a few pictures of it!

I think it turned out super cute! It didn't come off without a hitch though. Like you may be doing right now, I googled the One Yard Wonders Folklore Bag to see if anyone else had documented their experiences with it, and like many other people have said, the top band did not fit quite right with the bottom of the bag. I don't remember exactly how off it was, but I think the band may have been as much as an inch too long. I'm pretty sure this wasn't just cutting error, I was pretty careful with it. I worked around it though by putting a few little tucks in the top band near the side seams, and it turned out ok.

All in all, I enjoyed this project because it gave me some experience working with a smaller bag on my sewing machine - I had to do some tricky maneuvering to get all the top stitching sewn. Plus I learned how to put in a magnetic snap (it was super easy, and I love it when I get to use a hammer in my crafting - maybe I should become a carpenter!) So all you One Yard Wonderers, get out there and make your Folklore Bags, because they really are very cute! Just don't get too frustrated if your top band doesn't fit right - it happens to the best of us!
Friday, June 25, 2010
A focus on the crafts of others: No sew fleece blanket
This happened a long time ago, when it was still cold. Feels like forever ago now that it's getting to be in the 100s outside! Back in that wonderfully cold weather (which of course I hate when it is here) I helped my friend Katie make a no sew fleece blanket! This is one of my favorite crafts because you can do it pretty quickly, and the results are great! If you don't know how to do this already, I'll give you a quick rundown:
1) cut out 2 pieces of fleece the same size an lay them down together on the floor (right sides out!)
2) cut 4 inch squares out of each corner, and then cut a 4 inch slit every inch down each side, make sure that you cut through both pieces of fleece, creating a fringe all around the edge (It doesn't have to be 4 inches, - the length is up to you, just make sure it is consistent throughout!)
3) Tie a knot in each pair of fringies - the matching ones from each layer - all the way around the blanket - I like to start at the corners but you can really start anywhere, just as long as your pair the fringe up right.

Didn't she pick a pretty print? The other side is very pretty too! Katie really just came over to borrow my scissors, but I ended up helping her with the assembly too - it made for a very fun afternoon! I think towards the end of all the knot tying we realized we had the pieces wrong side out... oops! Of course with fleece it's still pretty on the wrong side, so it didn't really make much difference. Lucky us!

How Katie managed to make our fleece bow ties look cute, I'll never know. I wish I had a picture to show of my bow tie, because I was looking pretty ridiculous... Thanks for being my crafty BFF Katie!
PS: I know I'm not super great at explaining things, so if my instructions don't make sense, just leave me a comment with your questions! I'll try to respond ASAP. Also, there are plenty of great tutorials out on the inter-webs, so check there too!
Wednesday, June 23, 2010

Monday, June 21, 2010
Cute Flower Hairbows - great for the whole family!
I've said it before, and I'll say it again! I love the craft tutorials at Polka Dot Pineapple! Here's another of her tutorials that I just had to try - the Quick n' Easy Flower Hair Pins! This is another craft project that I completed ages ago. Maybe back in February? Anyways...
This craft is exactly what it is advertised to be - quick and easy! And it's fun too! I know a lot of cute little girls, and cute little girls need cute little hair accessories! I picked up some hair clips (these were ridiculously hard to find for some reason...) and some brightly colored stretchy headbands, since some little girls don't like to keep clips in their hair (Josie).
Instead of a little stack of buttons for the center, I used some covered buttons. It is really the only kind of buttons I had at the time, but it worked out really well because I could coordinate my fabrics! Great!

All my pieces, cut and laid out, ready to assemble!

Of course I had to make a special blue and orange headband for my little gator girlie!
I didn't take any "in process" shots other than these, but here is the finished product!

This set was given as part of a baby shower gift - I just love the pink headband!

The clips made great bows for my gift!

These headbands are great for toddlers...

moms...

and hey - there's me looking crazy!
Another great success!! I would absolutely recommend this project - even if you don't really know how to sew. I think anyone could do it! Go try it out if you could use a little more cute in your life!
Saturday, June 19, 2010
Not Reese's Fancy Peanut Butter Cups
Sometimes my crafts aren't fabric/bead/decoration crafts. Sometimes they are food crafts! Today's post is a food craft. I'll start with a little bit about my "kitchen self". I really don't care for cooking. When I lived alone I ate a lot of fast food and things out of boxes. My specialty dinners are grilled cheese and fried egg sandwiches, which I would make a lot because they took all of 5 minutes to prepare. I also made a lot of ground beef + dishes (as in ground beef plus 2 or 3 other things). I hate making things that use more than one pan because I hate doing dishes. That being said, I like baking, which usually uses tons of dishes, so that doesn't really make sense, but there you have it! I'm way more interested in making desserts and things that really have no nutritional purpose than in making things that will keep me alive and healthy(ish). I pretty much only save recipes for sweets. Like this one: home made peanut butter cups!
I love Reese's peanut butter cups. Especially the eggs that come out at Easter, and the other shapes that come out at other holidays. I'm all about the peanut butter in these things - I eat off as much of the chocolate as I can before I actually take a bite into them. Stephen is all about the whole chocolate peanut butter experience though. When I showed him this recipe he of course wanted to make them, but dark-chocolate style (so did I!) So we went to the store and bought some fancy dark chocolate, peanut butter and powdered sugar - this recipe is super basic and open for lots of variation BTW!
We decided to make ours mini-cups instead of the giant cups found on the instructables page. I was thinking if they turned out to be easy and good, then I would make some for a party at work. As it turns out, they aren't hard at all, but very time consuming. And they are good, but they ain't Reeses. I decided to scrap the idea of making enough for work and we just enjoyed the ones we made all by ourselves. I didn't take a lot of photos for this one (my hands got really messy!) but here are a few:

Here are my dozen cups filled with peanut butter and getting their chocolate top.

Done! Fresh out of the fridge and ready to taste!

And here's a really blurry one of the inside of a cup.
My final thoughts on this project? These did turn out pretty good, but we used super dark chocolate so they definitely tasted like "fancy food" which Reese's is not. I also think I put too much chocolate and not enough peanut butter. I ALSO think that this batch would have turned out better if we'd opted to do giant cups instead of these little ones, because more peanut butter would have been in them (but as you recall, I'm all about the peanut butter). So, with a little tweaking I think these could be great, and I'd probably make them again some day, but it's questionable whether they would ever be as good as real Reese's, which aren't that expensive, and a heck of a lot easier to get your hands on.
Thursday, June 17, 2010
Kirby's Epic Yarn: Wii's gift to the crafty community?
I don't like to post 3 days in a row. I feel like it gives people unrealistic expectations. But I couldn't resist!
Check out this awesome new Wii game! Everything is made out of fabric and yarn! It's like Nintendo is trying to reach out to the handmade community and tell them "get off your sewing machines, stop experiencing the real world, and come play our video game!" Actually, this is kind of a sneaky trick, but it's working on me :) Pretty much the only requirement I have in video games is that they are cute, and making it cute by creating a world made out of textiles? I'm sold.
Check out this awesome new Wii game! Everything is made out of fabric and yarn! It's like Nintendo is trying to reach out to the handmade community and tell them "get off your sewing machines, stop experiencing the real world, and come play our video game!" Actually, this is kind of a sneaky trick, but it's working on me :) Pretty much the only requirement I have in video games is that they are cute, and making it cute by creating a world made out of textiles? I'm sold.
Wednesday, June 16, 2010
Wordless Wednesday
I know writing this kind of negates the whole "wordless" idea, but I decided to hop on the bloggy bandwagon and start doing Wordless Wednesday posts. Fun right? I plan to use this as a preview of projects yet to come, somewhere to show off repeat performances of projects I've already featured, and as a place to highlight photos that don't really have anywhere else to go. I hope you enjoy it! Now without further ado, here's my first photo - I promise next week will really be wordless :)


Tuesday, June 15, 2010
Messaholic
It's honesty time here at Full of Craft. I really wish my craft room was organized. I sometimes like to pretend that everything is in it's place and easily accessible, but the truth is I'm a wreck. I do have plans for this room, and some day they may even come true, but as long as my craft room is also the guest bedroom I don't think it will ever be perfect. I dream of the day when I can have my own space to fill with shelves and shelves of fabric and pretty paper and buttons and bows all neatly and beautifully arranged but who are we kidding right? For your entertainment, here are some photos I snapped of the craft room at one of it's worst moments, most of which has been cleaned up, or at least moved, by now (I'm not going to go look at the room today, because I might find that it's actually worse off...)


Cutting board is almost always spread out in the middle of the room, unless company is coming over. It doesn't usually have so much random junk sitting on it.

The Storage Piano. Pretty much as looked like this for a year.

Green Chair #1. All this fabric has since been folded and put away. I think.

There is a bed under here somewhere... Thanks to some bed lifts most of this stuff now lives under the bed.

Green chair #2. I have an obsession with boxes and tins. Too bad I don't have an obsession for shelves to put them on.
I hope I helped you feel a little better about your overcrowded closets and messy nooks and crannies! Wanna come help me clean?
Sunday, June 13, 2010
I want to be Martha! Beaded Ribbon Necklaces
Well, except for the whole jailbird thing of course... This craft is a Martha Stewart craft - cute beaded ribbon necklaces! As you may or may not know, Martha Stew's* tutorials tend to be a little bit... tricky? They always seem super simple till you try to do them and then you end up with a mess of glue and glitter. This one was actually pretty easy though, the project is really straightforward. I did a few things differently, though. I didn't use her specific list of supplies (none are available in Waco of course), and I used two kinds of beads, and I knotted the ribbon at the end of my bead chain. I think it looks a lot better that way and it hides where you tie the thread around the ribbon. I love them and I wear them all the time! Here are the two I made for myself:


Flat blue rectangle and round gray stone beads with gray 3/8in (i think) ribbon

You can see the colors a little better in this one

Large chunky purple beads and green round stone beads on 5/8 (again, I think) purple ribbon

Another view

Here I am modeling the purple one on one of my most beautiful days.
And here's one I made for my mom for mother's day. I think that it's kind of bridal looking, maybe I should go in to the bridal jewelry business!


Now go out and make yourself some necklaces!
*I had a science teacher named Mrs. Stewart and we used to call her Mother Stew
Wednesday, June 9, 2010
A focus on the crafts of others: Crawfish art
As a blog owner, I like to take the time to highlight the craftiness of those around me. Recently I had some friends over for a delicious crawfish dinner only to discover that my friend Grant is truly a food ARTIST!


I forget what all this was supposed to represent, but it was something...
Who knew we had such genius in our midst! The food was amazing by the way! Stephen is kind of a food artist too - just a different kind :) It was a great night with good friends, and I hope we can all do it again soon!
Monday, June 7, 2010
More flowers!
Just a quick little post to show you something I've made! I already posted about these flowers, but I made a whole bunch more, and now this lovely bouquet is sitting on my desk at work, cheering me up every time I look at it (and in a cute little crafty pot instead of my waterford crystal vase)! Yay!


Saturday, June 5, 2010
Winner Winner Chicken Dinner! Nome's brag-a-long!
This post is EXTREMELY overdue. Like seriously. Ages ago (end of March) I won this blog giveaway at Naomi's blog - Nome's brag-a-long! This was the first blog giveaway I ever won and I was SUPER excited! I won 'giveaway #1' and got the super cute keyring pouch and fun cross stitch kit (I'm sad to say my kit is now buried somewhere in the craft room - I guess it will be a fun surprise when it turns up again!)
I've been using my little zippered pouch to carry all my allergy medicines. It's the perfect size! I love it! I'll have to find another use for it when allergy season is done.


I've been using my little zippered pouch to carry all my allergy medicines. It's the perfect size! I love it! I'll have to find another use for it when allergy season is done.
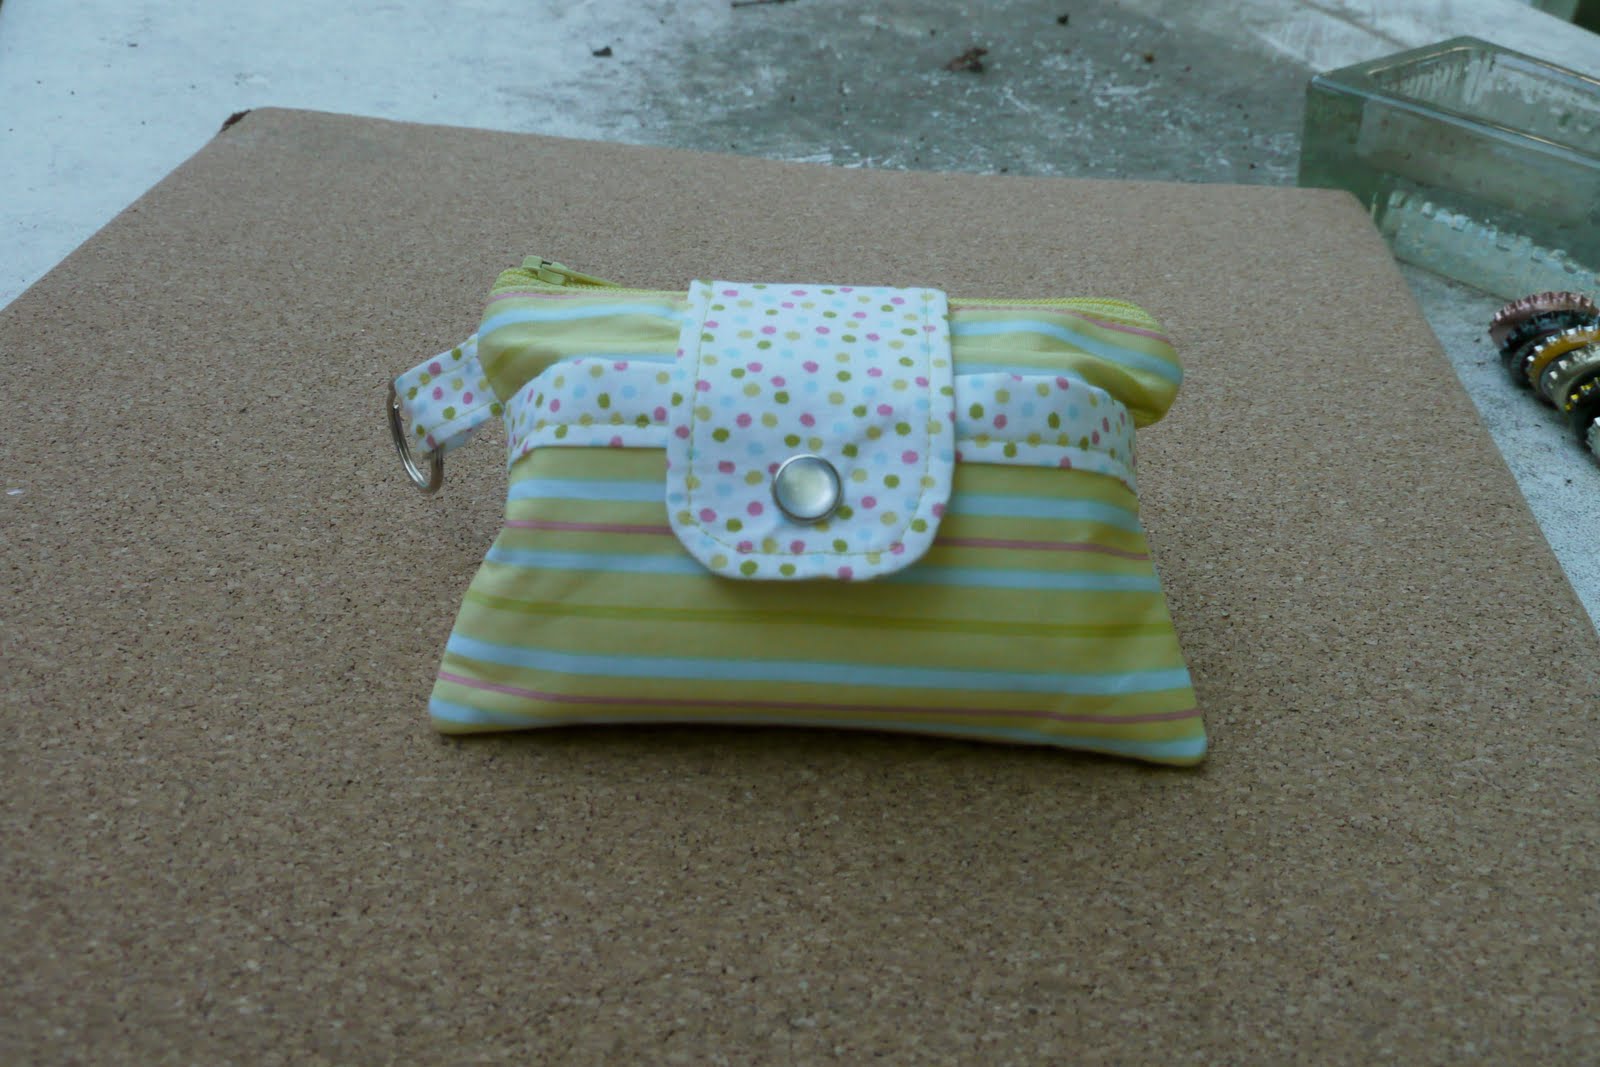
It is so cute and so well made! Love love love it!
Plus since more than 50 people entered the giveaway, Naomi included a little bonus prize - the cutest little owl keychain!

So sweet!
A big - long overdue - thank you to Naomi! Go ahead and check out her blog! She has made some really great bags! I absolutely love her fabric choices. Seriously - check it out!
Thursday, June 3, 2010
Dustbunnies put the "fun" in functional!

A while back I saw this tutorial for these goofy screen dusters and saved it away for the day when I could find cheap materials for it. Later I found the noodly wash mits at the dollar tree and knew that the time had come to make the neatest screen dusters ever! I went to the tutorial and printed out the pattern. This was a little tricky since I couldn't find a good program to get it sized properly. I think I ended up just opening it in paint and printing it full size, and it came out pretty close to correct, so I just went with it. Then I used it to cut out my pattern pieces and chop up my noodle mit:


Like so
FYI - if you chop up a noodly piece of fabric like this you will find little bits of noodle all over yourself and everything else in your craft room for the rest of your life.
This ended up being a super cheapy cheap project because I used leftover fleece from a different project, and leftover felt from another different project. I spent $1 on the mit, and $.99 on the safety eyes. It was really fast too - I finished both in one evening, which is pretty good for me given my habit of putting things off.

Laying out the spacing for the faces on Stephen's alien

Now the faces and eyes are sewn on - these are starting to look awesome right?

Voila! We're done!

And here's my bunny

"Wow! Thanks for making me this awesome computer cleaner honey! I love you so much!"
This was actually the first and last time the alien ever cleaned a screen. I brought my bunny to work but Stephen didn't want to take his with him. I found it under the couch the other day. I guess there is dust under there, but that's not really the point. Now it's sitting underneath the wii remote on the coffee table. Oh well. I understand that not everyone appreciates awesomeness the way I do.
Subscribe to:
Posts (Atom)


