Friday, October 29, 2010

Happy Birthday Nanny!

This past weekend Stephen and I went to visit our family in Yoakum.  It was Nanny's birthday so we knew it was going to be a big time party ;)

Happy Birthday Nanny!!

We ate yummy hamburgers...

I made Bryson's for him - when Stephen asked me why I didn't
make one for him I told him it's because Bryson is cuter!

We rode in the Mule with the boys...

Jadyn coming to pick us up

Dylan took us over some rough terrain.

Stephen got to drive too!

Driving was Stephen's favorite!

I saw some cats

Are these the kittens I saw last time I was here???

Bryson showed me a stick...

Actually, he was trying to get me to stop taking his picture

And the boys all played football.


While we're on the topic of football, let me take a moment to congratulate our Baylor Bears!  Sic 'em bears!  After years of disappointing seasons, we are finally bowl bound.  What a great homecoming! I don't follow football that closely, especially college football, but I'm really really happy for the Baylor community this year.  We're ranked all over the place!  It almost makes up for the heartbreaking, gut wrenching, may-as-well-say-it-Cowboys-season-ending, broken Tony Romo clavicle.  But let's not talk about that.

Dylan is our star Bulldog Pups football player.  I made the mistake of calling them the puppies once.  Stephen was quick to correct me though "It's the PUPS! Not Puppies!!"  Or something along those lines.

Dylan about to throw a pass...

It must have been a good one!

Jadyn is looking pretty good himself! 

I guess Bryson got tired of playing after a while
and decided to cut stickers out of the lawn instead.

But not Stephen - he plays to win!

Wednesday, October 27, 2010

Wordless Wednesday (sort of...)

Happy early Halloween from the cutest little monkey around!
Have fun and be safe!

Monday, October 25, 2010

Howdy!


Hello all. I took a day off. We will return to our regularly scheduled programming soon!

Friday, October 22, 2010

Paper Boxes - Quick, easy and fun wrapping idea!


Have you ever made origami paper boxes?  If you haven't you are missing out, because they are way easy, and a super cute way to "wrap" small gifts.  There are tons of great tutorials out there, so I'm not going to rewrite one here.  I can't remember what one I originally learned this technique from, but here's one that looks pretty good to me! I've seen ones where you don't cut the paper (I think...) but that seemed a little too complicated for me.  I think I'm origami impaired.

 Please excuse the ugly nasty dirty table.  I don't know why 
I thought this was a good place to take photos...

The box on the left is made from a couple full 12x12 sheets of scrapbook paper, the box on the right was made from paper cut down to about 8x8 I think. 

Once you've mastered the basic box, go here to try your hand at some Magic Boxes!  When they are closed they look like the orange and blue box in the first picture in this post but when they are open they look like this:

 Ooooooh....

Ahhhh....

Perfect for filling up with multiple small gifts!  Totally fun right?  Now go get yourself some paper and fold some boxes already!  It is a totally satisfying little craft to do - at least it is if you're me!

Wednesday, October 20, 2010

Monday, October 18, 2010

Hand Stamped Wrapping Paper


Since the holidays are fast approaching, I thought it would be fun to share some of the fun new crafty wrapping techniques I've been trying out.  One that I really enjoy is hand stamped wrapping paper.  A few months ago I decided I'd really like to start wrapping everything in brown paper and focus on bows and other embellishments instead of the predesigned patterns of paper available.  Then I thought that it would be really cute to stamp onto the brown paper to make my own designs.  It is a little extra work, but I think it's worth it for the cute factor :)

Here's a quick tutorial for you (not that I think you really need one, it's a pretty basic concept, but it will be good tutorial writing practice for me.)

First cut the size of paper you need from your roll.  Unless you want to wrap a bunch of presents in the same stamped design, then go ahead and cut a bigger piece.

Next lay your paper out flat.  Mine tried to curl back up on me so I weighted the corners and sides down as needed to make it lie down flat. 

Then just stamp as desired - this is the fun part :)


 I like to let mine dry for a little bit so my stamps don't smear, but you might not need to do this step depending on the kind of ink you use.

Now all that's left is to wrap your gift. 


Tada!  Super cute and fun! My brown paper is kind of thick so I wrapped it with packing tape, but plain old scotch tape should work fine.  Probably not the method you want to use if you're a last minute gift wrapper though...

Sunday, October 17, 2010

Winners!!!

Now for the moment you've all been waiting for - the winners of my giveaway!  And the winners are...

For the Rain Cloud notecards:

and for the Birdie Notecards:
Jami!

Jami and Jamie! What a fun coincidence :)  Congratulations to my two winners, I'll be in touch for your addresses (actually, I already have yours Jami!) and then I'll get your prizes in the mail ASAP!


Friday, October 15, 2010

Chocolate Blobbers! Yummy yummy!

Hello Internet!  Today I am going to teach you one of my secret family recipes!  I know - it's time to get excited!  Our food-craft for the day is Chocolate Blobbers.  Let's get started shall we?

**I forgot to mention - this recipe came into our family via my dear Aunt Becky!**

Here is what you will need:


 That is, one box of Cap'n Crunch Peanut Butter, Rice Krispies (you can use store brand, that is ok), one package of chocolate bark, and one can of Spanish peanuts (aka red-skinned peanuts). I'm pretty sure it's fine to use regular old peanuts, but who wants to take that risk!

The first step is to melt your whole package of chocolate bark in a nice big pot. Stir it occasionally, and don't turn your burner on too high or you'll scald your chocolate.  That wouldn't be good. 


 While it is melting, measure yourself out two cups of each of your cereals.  That's 2 cups of Cap'n crunch, and 2 cups of Krispies.  Not 2 cups of cereal total. (Don't use Total cereal for this recipe - it would probably get soggy.)


 You might as well go ahead and open up your can of peanuts now too.


 Then Voila!  Your chocolate is all melted! Actually, I'm not sure if I should really call it chocolate, since the package calls it "chocolate flavored coating".  It does have cocoa in it though, so that's good enough for me.


 Once it is melted, dump both cereals in it and the whole can of peanuts.


 If you're like me and peanut butter crunch is your favorite, go ahead and add a little extra.


 Then stir it up until everything in your pot looks well coated.


 Oh - I should mention here, you should line a few cookie sheets with waxed paper at the beginning of this process, because now you want to scoop globs of chocolate cereal/peanut mixture onto your wax-paper-lined cookie sheet.  Just make them good snack sized.  My sizing always depends on what spoon I'm using.


Once your cookie sheet is full, stick it into your fridge wherever you have room.  You can probably tell from this photo that my fridge was not prepared for the amount of chocolate blobbers it was going to have to accomodate.


 Then once they have hardened up, take them out of the fridge and chow down!  Yum!


That's it - super easy and quick!  I'm pretty sure this would work well with whatever cereal you want to use, but I like 'em this way, so I've never seen a reason to change.  My family's preferred method of storage is gallon zip-loc bags.  This one is a big favorite with my people, so I'm guessing yours will like it too!!  Enjoy!

Monday, October 11, 2010

Yo-Yo hair bows


I'm a bad blogger. I did not get my blog writing done this weekend, so today I'm putting up a short and sweet little post about some cute yo-yo hair bows I made back in July.  These are totally easy and quick to put together.  All you need is a little bit of fabric, a few buttons and some sort of hair clip.  My clips came from Jo-Ann Fabrics in the jewelry and beading section, I think I got a little baggie of 25 clips or so.  Oh and you'll also need some thread, and the knowledge of how to make a yo-yo. (Trust me - you CAN do this.  Also, I rarely turn under the edge of my yo-yo's since I usually cover the center with a button.  It's not that pretty, but it works!

I made this first one to wear in my hair on the 4th of July this year.  I know, I can't believe I wore this in my hair all day.  I still think it's cute though.  Anyways, it's two yo-yo's stacked on top of each other, and two stacked buttons on top of that.  I think I sewed them all together in one fell swoop.  Then I sewed it to the hair clip.


 I made these two to match the sweet little dresses I made a while back.  Totally cute, and much more age appropriate than my patriotic clip was, since they were going to little girls...  I actually think I hot glued the yo-yo's to the hair clip on the one on the right.  The one on the left is made exactly the same way as the patriotic one.


So there you have it.  A quick and easy way to make hair accessories to match any outfit, so long as you can find the right color fabric and buttons that is.  See you later this week when hopefully I'll have dedicated some more time to writing!  Peace!

Friday, October 8, 2010

Today is my 100th Blog Post!


Hooray for me! I made it to 100 blog posts.  Just as every blogger says on this momentous day, I never thought I would make it to 100 posts.  I'm not just saying that either - I am amazed at myself and feel like this is a real accomplishment.  Go me!


You may not know this about me but I'm a big dork about numbers.  No really.  I like to sit around and think about specific numbers and decide if they are good numbers or boring numbers. Good usually means there is something mathematically interesting about them.  Primes are always good of course. Squares are ok, but cubes are great.

I've gotta tell you though, 100 never really did it for me.  I mean sure, it's the first triple digit number, and it's a square, and there is a certain completeness about it, but 100 never wowed me.  So, in honor of this, my 100th blog post, I decided to turn to my trusty friend wikipedia to give me some interesting facts about 100.  Here were my favorites:


     - The prime factorization of 100 is 2 * 2 * 5 * 5, two primes squared.  That's kinda neat.

     - 100 is the sum of the first 9 prime numbers - awesome!

 
     - 100 is the sum of the cubes of the first four integers (aka 1^3 + 2^3 + 3^3 + 4^3) - very good!

     - 2^6 + 6^2 = 100 - that's just pretty, don't you think?


So, 100 has won itself over in my mind.  And to reward you for putting up with my geekyness (and mostly for being my wonderful friends and readers!) I've decided to have a giveaway!  Get excited everyone!  Up for grabs is a set of my world famous 
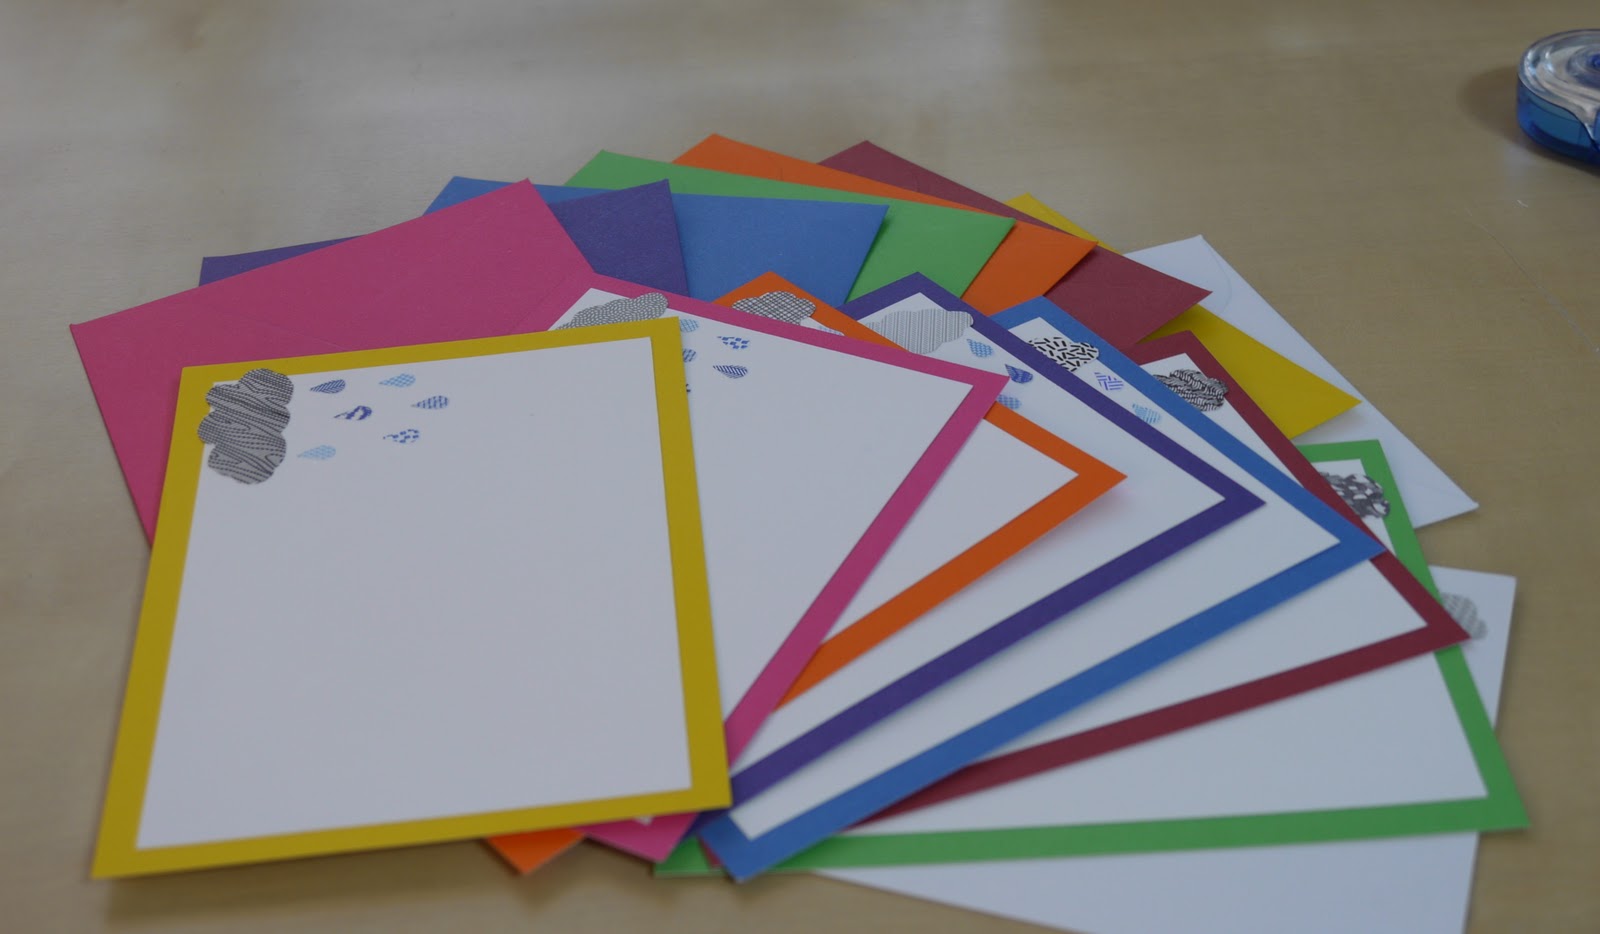
raincloud cards (featured here this past Monday)!


These ones are extra special too because they use all kinds of pretty security paper instead of just one black variety, and one white variety, like I did in the first set I made.  The winner of these of note cards will get a set of 8 cards and 8 matching envelopes.  Of course if you are the winner, you can send the pink one in the purple envelope, and the green one in the yellow envelope if you want to.  I know that's what I'd do.


 And since I'm so wonderful and awesome,  I decided to offer up a second prize.  Another lucky winner will get this set of birdie cards.  These were hand stamped by yours truly and I colored the little birdie in a contrasting color to the card.  Fun!  This is a set of 6, and it will come with matching envelopes as well. Oh and just FYI - I do carve my own stamps sometimes, but the birdie stamp is a store bought one.


 Aaaand, just for the heck of it, each winner will also get a couple of my hand-carved, hand stamped Halloween cards. I know, I know.  The lettering isn't exactly straight.  Tell people your kids made 'em.


So how do you become one of my two wonderful winners?  Just leave me a comment!  Tell me congratulations, or how wonderful you think I am, or whatever you want.  Following my blog is not required, but you do need to make sure I can get to your email address somehow.  Either leave it in your comment (be sure to spell out the "dots" and the "ats" to keep spammers from finding it) or make sure it is easy for me to get to in your blogger profile. The easier it is for me to find your email address, the more I will like you.  Not that this will affect your chance of winning at all. Oh and if you absolutely hate one set of cards, and love the other, you might want to mention that in your comment.  I would hate for you to win something you think is just the worst.

Now, since I love my followers, there is a special bonus for people who are ALREADY following my blog before I put up this giveaway.  If you were already following my blog - as in you've clicked on the "Follow with google friend connect" button on the side bar, and mention it in your comment, you get one extra entry!  Don't say I don't love you ;)  This will be verified - I have a list, so no cheating!  If you want to sign up to follow now, great! I’m happy to have you here, and I will probably have another giveaway soon, so you can take advantage of the bonus entry then!


Giveaway is now closed - thanks for entering!

Thanks to all of you for reading!  Here's hoping we get to 200!